Imagine this: you're chilling at a café sipping your favorite latte, but suddenly you need to check something on your Raspberry Pi back home. Sounds impossible? Not anymore! Accessing your Raspberry Pi remotely is easier than you think. With a few tweaks and some setup, you can control your Pi from anywhere in the world. Let's dive into how you can make this happen!
Nowadays, remote access has become a necessity, not just a luxury. Whether you're a tech enthusiast, a hobbyist, or a professional developer, having the ability to access your Raspberry Pi remotely can save you time and effort. But hey, don't worry if you're new to this. We'll walk you through everything step by step.
In this article, we'll cover everything you need to know about accessing your Raspberry Pi remotely. From setting up SSH to using third-party tools, we’ve got you covered. So, grab your favorite snack, and let’s get started!
Read also:Rulz Kannada New Movies 2025 A Cinematic Explosion You Cant Miss
Here’s a quick table of contents to help you navigate:
- What is Raspberry Pi?
- Why Access Pi Remotely?
- Preparing Your Pi's
- Setting Up SSH
- Using VNC
- Port Forwarding
- Dynamic DNS
- Third-Party Tools
- Security Tips
- Troubleshooting
What is Raspberry Pi?
Alright, before we dive into the nitty-gritty of accessing your Pi remotely, let’s first talk about what Raspberry Pi actually is. The Raspberry Pi is a tiny yet powerful computer that can fit in the palm of your hand. It’s super affordable, versatile, and perfect for all kinds of projects, from home automation to gaming and beyond.
Think of it as a mini computer that you can hack, modify, and experiment with. It runs on Linux-based operating systems, making it a favorite among developers and hobbyists alike. And the best part? You can control it from anywhere if you set it up correctly.
Why is Raspberry Pi so popular?
- It’s affordable and accessible to everyone.
- It’s super versatile and can be used for a wide range of projects.
- It has a massive community of developers and enthusiasts who share knowledge and resources.
Why Access Pi Remotely?
Let’s face it: sometimes life gets in the way, and you’re not always near your Raspberry Pi when you need it. Accessing your Pi remotely gives you the freedom to control it from anywhere, whether you're at work, on vacation, or just hanging out with friends.
Here are a few reasons why remote access is so important:
- Convenience: No need to physically be near your Pi to manage it.
- Productivity: You can work on your projects even when you're away.
- Security: Monitor your home security systems or IoT devices remotely.
- Automation: Control smart home devices or automate tasks from afar.
Basically, accessing your Pi remotely opens up a world of possibilities. You can do pretty much anything you want, from anywhere in the world.
Read also:Hdhub4ucom 2025 Your Ultimate Guide To The Latest Streaming Trends
Preparing Your Pi's
Before you can access your Raspberry Pi remotely, you need to make sure everything is set up correctly. Here’s a quick checklist to help you get started:
- Install the latest version of Raspberry Pi OS: Make sure your Pi is running the latest version of the operating system. This ensures you have all the latest features and security updates.
- Connect your Pi to a stable internet connection: A reliable internet connection is crucial for remote access. If your connection drops, you won’t be able to access your Pi.
- Set a static IP address: This makes it easier to connect to your Pi without worrying about changing IP addresses.
- Enable SSH: Secure Shell (SSH) is the most common way to access your Pi remotely. We’ll cover how to set it up in the next section.
Tips for Preparing Your Pi
Here are a few extra tips to make sure your Pi is ready for remote access:
- Make sure your Pi is updated and upgraded using the command `sudo apt update && sudo apt upgrade`.
- Consider setting up a backup plan in case something goes wrong.
- Use a strong password or SSH keys for added security.
Setting Up SSH
SSH (Secure Shell) is one of the most popular ways to access your Raspberry Pi remotely. It allows you to securely connect to your Pi from another computer using a terminal or command prompt.
Here’s how you can set up SSH on your Raspberry Pi:
- Enable SSH: Go to the Raspberry Pi Configuration menu, navigate to the Interfaces tab, and enable SSH.
- Find your Pi’s IP address: Use the command `hostname -I` to find your Pi’s IP address.
- Connect using SSH: From another computer, open a terminal or command prompt and type `ssh pi@
`.
That’s it! You’re now connected to your Raspberry Pi remotely using SSH. Easy, right?
Advanced SSH Tips
- Use SSH keys instead of passwords for added security.
- Change the default SSH port to make it harder for hackers to find.
- Use tools like PuTTY if you’re on Windows and prefer a graphical interface.
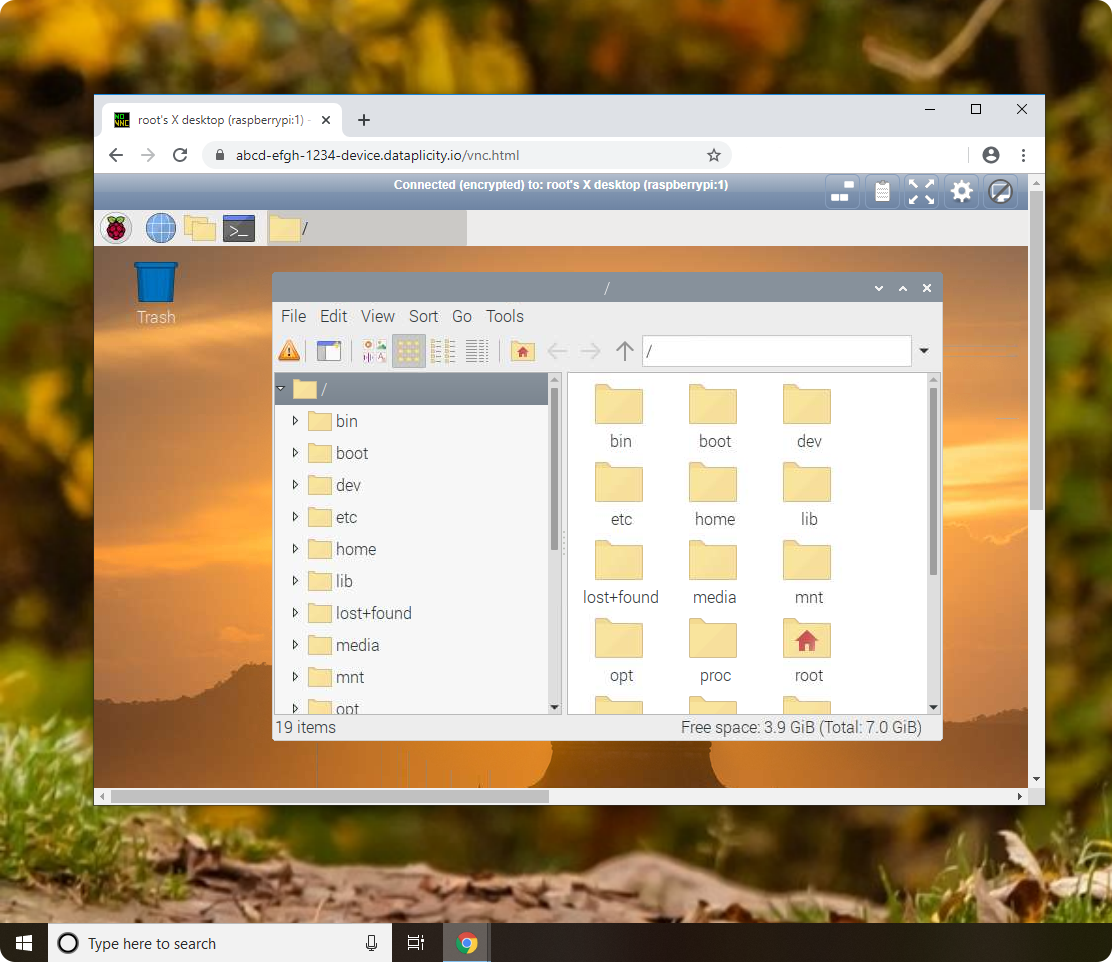
Using VNC
While SSH is great for command-line access, sometimes you need a graphical interface. That’s where VNC (Virtual Network Computing) comes in. VNC allows you to access your Pi’s desktop remotely, just like you would if you were sitting in front of it.
Here’s how you can set up VNC on your Raspberry Pi:
- Install VNC Server: Use the command `sudo apt install realvnc-vnc-server realvnc-vnc-viewer` to install VNC.
- Enable VNC: Go to the Raspberry Pi Configuration menu, navigate to the Interfaces tab, and enable VNC.
- Connect using a VNC client: Download a VNC client on your computer and connect to your Pi’s IP address.
With VNC, you can access your Pi’s desktop as if you were physically there. Perfect for when you need to use graphical applications or tools.
VNC Alternatives
If VNC isn’t your thing, there are other options like:
- TeamViewer
- NoMachine
- AnyDesk
Port Forwarding
Port forwarding is a crucial step if you want to access your Raspberry Pi remotely from outside your local network. It allows you to bypass your router’s firewall and connect directly to your Pi.
Here’s how you can set up port forwarding:
- Log in to your router: Use your web browser to access your router’s admin interface.
- Find the port forwarding settings: Look for a section called Port Forwarding, NAT, or Virtual Servers.
- Set up a new rule: Enter the Pi’s IP address, the port number (usually 22 for SSH), and save the changes.
Now you should be able to access your Pi from anywhere using your public IP address and the forwarded port.
Dynamic IP Addresses
One thing to keep in mind is that most internet service providers assign dynamic IP addresses, which can change over time. If your IP address changes, you’ll lose the ability to access your Pi remotely. We’ll cover how to solve this problem in the next section.
Dynamic DNS
Dynamic DNS (DDNS) is a service that allows you to assign a domain name to your changing IP address. This way, even if your IP address changes, you can still access your Pi using the same domain name.
Here’s how you can set up Dynamic DNS:
- Choose a DDNS provider: There are many providers like No-IP, DuckDNS, and Dynu that offer free DDNS services.
- Sign up and create a hostname: Follow the instructions on the provider’s website to create a hostname for your Pi.
- Install the DDNS client: Most providers offer a client that you can install on your Pi to keep your IP address updated.
With Dynamic DNS, you’ll never have to worry about your IP address changing again.
DDNS Providers
- No-IP
- DuckDNS
- Dynu
Third-Party Tools
If you’re not into setting up SSH, VNC, or port forwarding, there are plenty of third-party tools that can help you access your Raspberry Pi remotely. These tools are often easier to set up and use, making them perfect for beginners.
Here are a few popular options:
- ngrok: A simple tool that allows you to expose your Pi’s local server to the internet.
- Weaved: A cloud-based service that lets you access your Pi remotely without needing to set up port forwarding or DDNS.
- Cloudflare Tunnel: A secure way to expose your Pi’s services to the internet without opening any ports.
These tools can save you a lot of time and effort, especially if you’re not comfortable with setting up everything manually.
Security Tips
Security is always a top priority when it comes to remote access. You don’t want some random hacker gaining access to your Raspberry Pi. Here are a few tips to keep your Pi safe:
- Use strong passwords: Avoid using weak or default passwords.
- Enable two-factor authentication: Add an extra layer of security to your SSH connections.
- Limit access: Only allow specific IP addresses to connect to your Pi.
- Keep your Pi updated: Regularly update your Pi’s software to patch any security vulnerabilities.
By following these tips, you can ensure that your Raspberry Pi remains secure even when accessed remotely.
Troubleshooting
Even with the best setup, things can sometimes go wrong. Here are a few common issues you might encounter and how to fix them:
- Can’t connect via SSH: Make sure SSH is enabled and check your IP address.
- VNC connection fails: Verify that VNC is installed and running on your Pi.
- Port forwarding not working: Double-check your router’s settings and ensure the correct port is forwarded.
- DDNS not updating: Make sure the DDNS client is installed and running on your Pi.
If you’re still having issues, don’t hesitate to reach out to the Raspberry Pi community or forums for help.
Conclusion
Accessing your Raspberry Pi remotely opens up a world of possibilities. Whether you’re managing home automation systems, working on projects, or just checking in on your Pi, remote access makes life so much easier. By following the steps in this guide, you can set up secure and reliable remote access to your Pi in no time.
Remember, security is key. Always